How To Stop Windows 10 From Consuming Much Data

Windows 10 is mainly built to be updated regularly, that is why whenever there is a strong network connection, it will start updating any available new features without even our notice and will result to data consumption unknown to us, to some we will begin to wonder what could be the cause of data disappearing without our notice.
In this tutorial we are going to be looking at some of the possible situation that can lead to data consumption, just follow the tutorial carefully and I believe this would help in the reduction of data consumption.
1. STOP SVCHOST.EXE FROM RUNNING
This is one of the data eater in windows 10, this app eats up to 1gb in just 30 min. It is an application that is responsible for some of the updates that take place in windows 10.Some of this updates includes windows, windows defender and other Microsoft products etc.In order to turn this feature off, follow the given procedure
- Go to your system Control Panel
- Continue to the Administrative Tools
- Switch to Services
- And proceed by searching BITS and
- Final Stop the service by right clicking on BITS then click on stop.

If this procedure is not too fast for you, you can alternatively use the command prompt. To use command prompt on your system search for command prompt, right click on it and run as an Administrator. Copy and paste the below command in your command prompt.
net stop BITS then press enter.
Whenever you want to update windows again, you will need to enable it again with
net start BITS
2. SET YOUR COMPUTER CONNECTION AS METERED
Setting the feature, it will notify windows 10 that you don’t want to run any updates automatically and to setup this feature, just follow the given below procedure.Kindly Go to Start in your windows
- Proceed by going to Settings
- Next go to Network & Internet
- Continue to Wi-Fi
- Final go to Advanced Options. Then Toggle on Set as metered connection

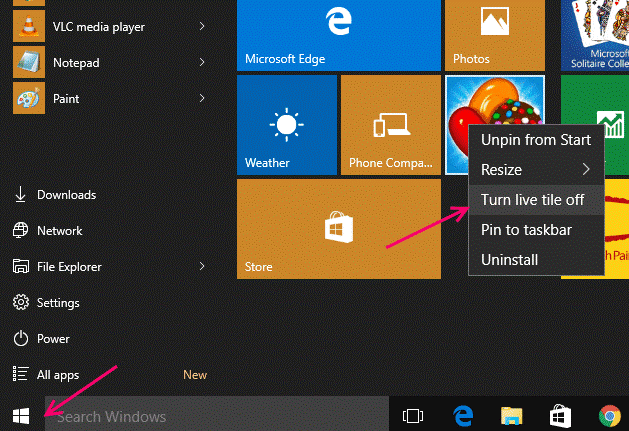
3. TURN LIVE TILES OFF ON YOUR PC
Although this doesn’t really save much data on your system by disabling them but nevertheless you can still save a little bit of data on your PC. Some may ask what is Live Tiles, Live Tiles are those image or app that show on your desktop when your tap the Start Menu on your PC. Just as I said before it doesn’t really save much data but you can disable it to save more battery on your PC.To prevent a tile from automatically downloading and displaying new data follow the steps below:
- Right-click on the tile in the Start menu
- Point to “More”
- select “Turn Live Tile Off.”
- Then finally turn the feature Off turn save your PC battery.
4. TURN OFF BACKGROUND APPS ON YOUR PC
By default, Windows 10 run some application automatically on the background whenever you turn on your PC and that eat a lot of data, if these are on your PC data consumption rate increases but you can consider turning it Off to save yourself some data.To Turn off background apps just follow the below procedure, to turn this feature Off:
- Go to Settings
- Proceed to Privacy
- Next to Background apps
- Proceed by turning off the one you don’t really need

5. PREVENT AUTOMATIC APP UPDATES AND LIVE TILE UPDATES ON YOUR PC
Automatically windows 10 try to update some apps from the store and this can consume your data without you noticing it. But this feature can be disable from updating store apps and live tile update on your system, just follow the below procedure.- Click or tap your profile picture near the search box
- Select “Settings.”
- Disable the “Update Apps Automatically” checkbox.

Note: You can still update your Store apps manually from the Windows Store app, but Windows won’t automatically download app updates on its own
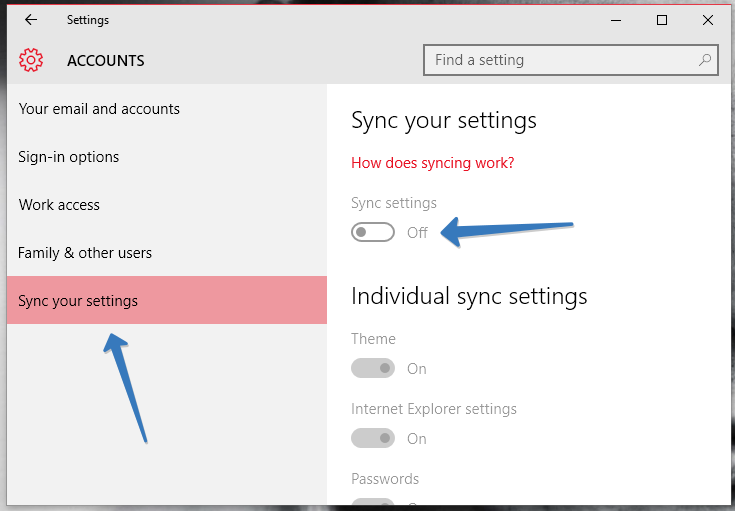
6. DISABLE PC SYNCING FEATURE
This is a very useful feature in windows 10. But honestly, you don’t need to have it running around the clock. You can turn it off and when you do need to keep things synced, you can easily turn it on.To disable the feature on your PC just follow this procedure that is given below to achieve your aim:
- Go to your System Settings
- Proceed to Accounts
- Next Sync your settings and turn Sync settings off.
7. DEFER YOUR WINDOWS 10 UPDATES
If you are running Windows 10 Pro or Enterprise, there is an option in Windows Update settings that lets you defer the download of new features for several months. This can be significant since new feature improvements can be quite large. This does not affect the download and installation of security updates.To Defer Upgrades your window 10 update follow this procedure below:
- Go to Your PC Settings
- Proceed to Update and Security
- Next to Windows Update
- Continue to Advanced Options scroll down a bit and check Defer feature updates

Note: There were no feature built to stop windows 10 from automatic download and update but following this procedure below on this article (related article), that will be able to help with this issue.
Related Article: Read also how to stop windows 10 automatic download and updates
8. TURN OFF “OneDrive” ON YOUR PC
OneDrive is one of the other background apps in the Windows 10 that depletes your data in no time without you noticing it. One Drive is one of the feature that help you sync your files which makes life simpler, but not all of us need that function to continue running on our PC.To deactivate the OneDrive from running on your PC, just follow the below steps carefully.
- Right click on the “Task Bar”
- Open “Task Manager” from the list or alternatively use your keyboard shortcuts, such as, CTRL + SHIFT + ESC all at once to open it.
- Click "more details" if it's not already expanded
- click the “Startup” tab
- Scroll down and select “Microsoft OneDrive” and disable it.

9. TURN OFF AUTO UPDATE OF OFFLINE MAPS IN WINDOWS 10
Another feature that also eat up data on your windows 10 is offline maps, disabling this feature might save you some data and to do that, just follow the below process.- Just go to Settings on your PC
- Proceed to System
- Go to Offline Maps
- Turn off the option Automatically Update Maps.

10. SAVE DATA ON WEB BROWSING
At times some of the data consumption rate do come from your web browser, to check if this is true, just look at the Data Usage Screen to see whether your web browser is really consuming your data.
To save data on this web browsing, use a web browser that includes a built-in compressing proxy feature. The web browser will route the data through other servers where it’s compressed before being sent to you.
Google offers an official Data Saver extension for Google Chrome, and it functions the same as the Data Saver feature built into the Chrome browser on Android and iPhone. Install that into Google, and you’re good to go. The Opera browser also has a “Turbo mode“, which works similarly.
Download Data Server Extension HERE
Download Opera Turbo Mode HERE
11.Disable Notifications

“Notifications” is another section where you have the opportunity to save some data. Simply disable the notifications if you do not need to be constantly informed of the current activities by the background apps. Simply right click on the “Action Centre” icon and click on the “Turn on quiet hours” to turn it off.
12. Disable Automatic Peer-to-Peer Update Sharing:
By default, Windows 10 automatically uses your Internet connection to upload Windows and app updates to other Windows 10 PCs. Windows 10 won’t upload updates if you set a connection as metered, but you can also turn it off directly.
To prevent the automatic uploads on all networks, you’ll need to open the Settings app, go to Update & Security > Windows Update and click “Advanced Options.” Click “Choose How Updates are Delivered” and set this option to just “PCs on My Local Network” or disable it.
13.Disable Bandwidth Sharing !
Windows 10 have come up with an improvement in its Windows Update option that allows it to sync updates from a local network PC in a P2P (peer-to-peer) style named “Windows Update Delivery Optimization” or WUDO.

WUDO is ideal for situations if your OS is set up with “Metered” connection but have more than one computer using the Windows 10 operating system. However, if the computers in the local network are of the same built, you can make use of only computer to update the other.
- In order to deactivate this configuration click open “Settings” option from clicking on the windows start key and then settings.
- Then select “Update and Security”.
- Go to “Windows Update”.
- Finally select “Choose how updates are delivered”.
- Once you reach this option slide it to “OFF” and there you go!
WUDO is a dicey feature offered by Windows 10 since in its Home and Pro versions the WUDO is set in such a way that it transports Windows Update informasi to other computers via the internet, but only to computers in the local network in Education and Enterprise versions. So in situations where you are bound in a limited modem speed it is a better idea to stay away from sharing updates online with other computers.
14. CHECK NETWORK USAGE IN WINDOWS 10 VIA NETWORK SETTING SECTION
If after undergoing all this procedure and you still find out that your PC is still using much data, then follow the procedure carefully and see the app that is using much data on your PC
- Just Navigate to Settings on your PC
- Next to Network & Internet
- Select “Data usage”
- Then click on "Usage details"

Or alternatively view network usage via the Task Manager access the Task Manager via keyboard shortcut (CTRL+SHIFT+ESC) or type “task manager” in the Start Menu search box.

In the Task Manager select the “App history” tab. There you’ll find two columns related to data consumption: “Network” and “Metered network”.
All the visible apps are either core Windows apps are Windows Store apps. Maddeningly, the Task Manager still does not display data usage for regular old traditional Windows applications. Hence, we don’t get clear data of how much data each application is using. That’s why the second Method is more preferable sometimes.
Note: This enable you to note some of the apps that is sucking your data on your PC. It will give you all the details you need to know for you to take the necessary acts.
If this article has been helpful,please due well to share with your friends and also comment on this or you still have other method on how to stop windows 10 from consuming much data,please due share for other community users to benefit from it.
Enjoy!
Search Term: how to restrict background data in windows 10,windows 10 bandwidth limit
windows 10 bandwidth usage,how to restrict background data in windows 7,windows 10 data usage reset,how to stop background data usage in windows 8,how to reduce internet data usage on windows 7,windows 10 data usage not working.